


Overview
In the previous chapter, we saw how DHCP is useful in assigning ip addresses to hosts in a network. In this chapter, we will look at another important ip service that helps hosts access the internet. We will learn about, NAT operation and IPv4, and configure and troubleshoot NAT.
NAT in today’s networks
In previous topics, we learnt about IPv4 addressing and how we can address network devices. We also learnt that there are different types of IPv4 addresses: such as the RFC 1918 addresses.
There are 2^32 ip addresses which is: 4 294 967 296 (four billion) however, not all these can be used and the number of remaining ip addresses is reducing.
The table below shows the ranges of private addresses as defined by RFC 1918:
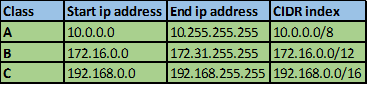
These IPv4 addresses are reserved for private network communication and cannot be used to communicate on the internet.
The need to connect to the internet presents us with a major problem. We cannot use private IPv4 addresses to access the internet and at the same time, the number of public IPv4 addresses is limited. Therefore, we need a way in which hosts in our network that have been assigned private IPv4 addresses can access the internet.
NAT (Network Address Translation) is our solution to the internet connectivity problem. With NAT, an enterprise can use a few number of public IPv4 addresses to access the internet even if they have many hosts who have been assigned private IPv4 addresses.
What is NAT?
Take the analogy of an office receptionist. In company ABC, we have 10 employees, including the secretary. Each employee has a desk and a phone that serves in internal communication between employees, this phone system is routed through a PBX system. The receptionist has a phone line that is used to communicate with different people externally.
However, in this scenario, there are times an employee may want to make a call to a client or a partner organization, for this, the call is routed through the receptionist’s desk and forwarded. It is highly unlikely that all the employees will want to make external calls and therefore this solution is efficient and it saves the company money.
NAT, works like the receptionist. The figure below shows NAT operation.
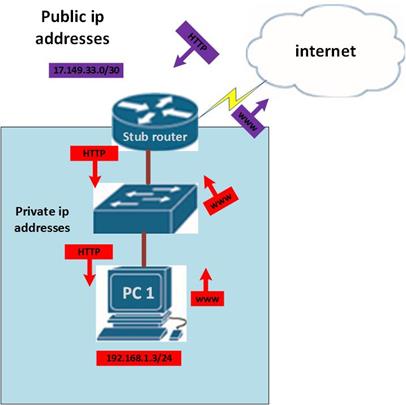
In this scenario, there are two networks that are connected by the stub router.
The network in which PC 1 is in is a stub network and devices in this network can only access outside resources using the stub router.
When PC 1 wants to access a website, – shown by the red arrow, it sends the packet to the stub router. When the router receives this packet, NAT translates it to a form that can be routed to the internet – shown by a magenta arrow. The packet is then forwarded to the internet.
When the reply comes back, NAT on the stub router, NAT knows where the packet came from and it forwards it to PC 1.
NOTE: NAT works by translating the RFC 1918 private IPv4 addresses we use in our internal networks into public IPv4 addresses that can be routed over the internet. This also enhances security because users in external public networks cannot access information on private networks, however, this does not mean that NAT is a replacement for firewalls.
NAT terminology
The figure shown below demonstrates the terminologies used when we configure NAT. in this scenario, R1 is configured for NAT. this means that it has public IPv4 addresses that it can give to PC1 and other hosts for accessing the internet.

Inside local address – these are the private IPv4 addresses as defined by RFC 1918 that are used to address hosts in the private networks.
Inside global address – this is an IP address that can be used by a host in the internal network to access the internet. In our scenario, the IP address that PC1 can use to access the internet is the 14.132.1.3 IP address.
Outside global address – this is any public IPv4 address that has been configured on a device on the internet. In this scenario, the IP address that is configured on the web server is an example of an outside global address.
Outside local address – this is similar to the outside global addresses and they are local IP addresses configured on any external network.
Dynamic Mapping and Static Mapping
There are two types of NAT translation: dynamic and static.
- In dynamic NAT, the router is usually configured with a pool of IPv4 addresses. Hosts who want to access the internet request the router to assign them with an available public IPv4 address which they can use to access the internet with.
- Static NAT is the mapping used in most web servers where the IPv4 address is rarely changed. In static NAT, a public IPv4 address is usually mapped to a single host in an internal network.
NAT Overload
NAT overloading, which is also known as PAT (Port Address Translation), is a way to map many private IPv4 addresses to significantly fewer public IPv4 addresses. We may have 100 private IPv4 addresses mapped to 2 public IPv4 addresses.
In NAT overload, the router usually maintains different TCP/IP sessions and assigns a port to each of the devices that are connected to it. In this case, when addresses are translated, they are given the same public IPv4 address but with a different port that identifies the source device. When the router gets the reply from the internet, it matches each conversation to the correct device using the port number.
The diagram below shows how this works.
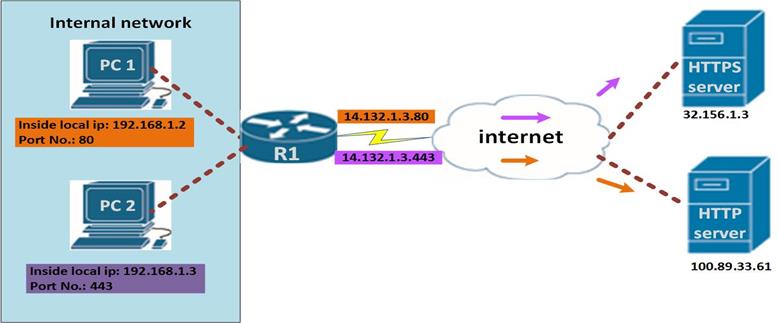
From the figure, PC 1 and PC 2 both want to use the internet, PC 1 has a HTTP message, for the ip address 100.89.33.61, while PC 2 sends a message to the HTTPS server located on 32.156.1.3, when the router receives these messages, NAT adds the source port information so that it can distinguish the communication streams from the two PCs. The two packets are then given the same global ip address and tagged with the port number.
When the reply is sent by the HTTP and HTTPS servers, they retain the port information. Once the message is received by R1, it knows the destination of each packet based on the port that the packet is addressed to.
Benefits and drawbacks
Some of the benefits of NAT include:
- With NAT, the exhaustion of IPv4 addresses has been reduced by using private addressing and allocating few IPv4 addresses to companies that want to use the internet.
- NAT has made it possible to address inside local networks with enhanced flexibility. This is because there is a structure in private IPv4 addressing that can be implemented in any organization.
- With NAT, we have enhanced network security, this is due to the fact that private IPv4 cannot be used in the internet, and therefore, information in private networks cannot be viewed unless an attacker has access to the private network.
Although NAT is beneficial and is responsible for the survival of IPv4, there are some drawbacks.
However, NAT does have some drawbacks.
- With NAT, the network performance is reduced, this is because there may be switching delays as a result of translation of the IPv4 addresses in the packet headers.
- NAT reduces creativity and innovation in the internet age. For example connections that need external global addresses initiating the connection to inside networks can be disconnected.
- The use of VPNs is made difficult since NAT can modify values that are needed by these protocols to work.
NAT configuration
Static
With Static NAT, external devices can initiate communication to internal network or inside local addresses. For example, if you had a web server in your internal network, static NAT would allow hosts located on the internet to access web resources on your web server by allowing mapping of the web server’s internal IPv4 address to a public IPv4 address permanently.
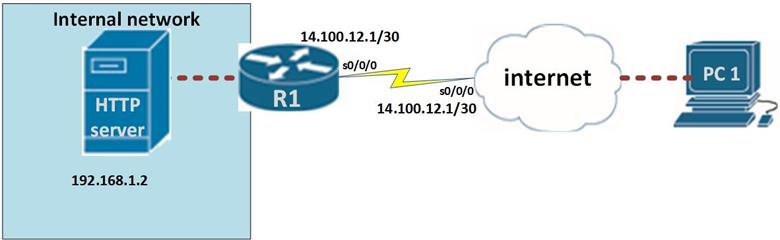
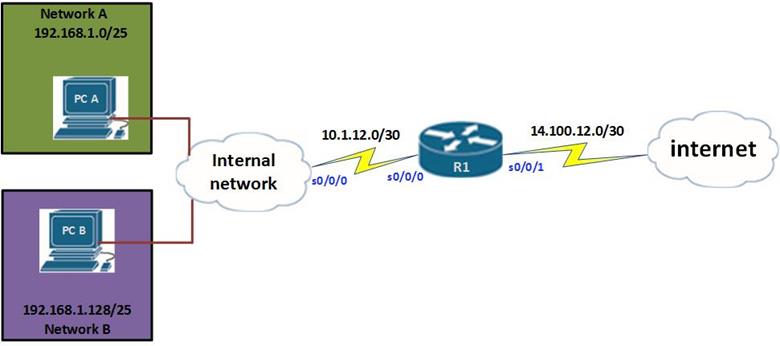
For example, in the scenario shown below, the web server is located in our local network. Users in external networks may want to access websites that are on this web server. Static NAT would be used in this case.
The configuration of static NAT is not complicated. The only thing that a network administrator needs to do is; specify the inside local address that should be translated and then mapping it to the outside global IPv4 address. Then we need to specify the inside network interface and the outside global interface.
The commands needed to accomplish this are shown below.
Step 1. Mapping of the inside IPv4 address to the public IPv4 address:

In this scenario:

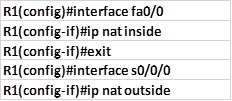
Step 2. Identifying the inside interface and the outside global interface by using the command “ip nat <inside/outside>” on the appropriate interfaces. The inside interface in this case is the fa0/0 interface connected to the HTTP server, while the outside global address is the s0/0/0 interface on R1.
This is shown below.
In this scenario, the router will translate the packets from the private address of 192.168.1.2 into the outside address of 14.100.12.1, the host who is located on the internet will not forward web requests to the private IP but to the public IP address. The router connected to the web server will then forward the web traffic to the web server on 192.168.1.2
The commands “show ip nat statistics” and “show ip nat translation”, will show the specific NAT Statistics and translation that have occurred for the configured NAT mapping. The output of these two commands is shown below.
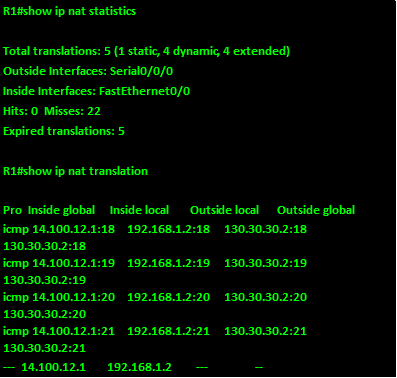
As you can see from the output above for both commands, the total translations are shown as 5, and the specific translations are shown in the show ip nat translation command. We will discuss the use of this command in more detail at a later stage.
Dynamic NAT
With static NAT, we usually map an internal local address to a global address so that hosts on public networks can be able to access a device in the internal network. With dynamic NAT on the other hand, we map inside local addresses which are internal network to global addresses so that they can access resources on the internet.
In dynamic NAT, we need to specify which IP addresses should be translated using an ACL. In the scenario shown below, we are supposed to translate only the network A connected to PC 1 and ignore network B.
The steps involved in dynamic NAT configuration include:
- Create a pool of public ip addresses that we will map private ip addresses to.
- Create an access list to permit the ip addresses that we want to be translated
- Bind the nat pool to the access list
- Apply the NAT configuration to the interfaces.
Step 1. Create a pool
The nat pool is created with the command “Ip nat pool” the structure of this command is shown below followed by the command used on our internet gateway router.


Step 2. Access list
This access list will specify the ip addresses in the internal networks that should be translated by NAT.

Step 3. Bind the access list to NAT
This command is used to bind the access list that we just created to the NAT pool. The command structure is shown below.

On our router this is shown below.

Step 4. Apply NAT to the inside and outside interfaces.
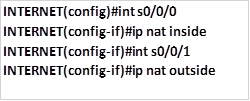
These commands are used to specify the inside and outside interfaces.
NOTE: configuring NAT is one of the most important aspects in CCNA simulation exams as well as in real world examinations so you should practice NAT often so as to fully understand it. It would be wise to have an internet connection in the lab and use of real devices.
NAT overload
As you may have noticed, in the above scenario, we have used a NAT pool that consists of many ip addresses. However, the ISP may not always give you a range of ip addresses. Therefore you may need to configure NAT overload.
The configuration commands needed to configure NAT overload are almost similar and as such we have shown the different commands that are used to specify overload.
The command that is used to define the NAT pool may only consist a few ip addresses or even 1, therefore you may leave out the netmask command. As shown below.

The above example shows a NAT pool named NAT_OVERLOAD that has only 4 public ip addresses.
The final step in configuring NAT overload is when you bind the access list to the NAT pool, in this scenario, you will have to add the “overload” keyword at the end of the command as shown below.

NOTE: You should be very careful when configuring NAT overload. And following this guide as well as more labs will help.
Verifying and troubleshooting NAT
It is important to verify NAT operation. There are several useful router commands to view and clear NAT translations.
Show ip nat translations
In the output shown below, the number of NAT translation is shown. In our scenario, NAT has translated four inside local addresses to outside global addresses. This command can be used to verify the operation of NAT by confirming whether NAT is actually mapping private IPv4 addresses to public IPv4 addresses.
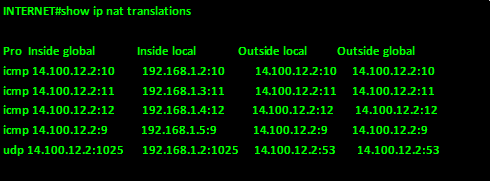
As you can see from the output above, the inside local addresses are being translated to outside local ip addresses that can traverse the internet.
This command can be useful when you want to verify that the NAT configuration is working and inside local ip addresses are being translated.
Show ip nat statistics
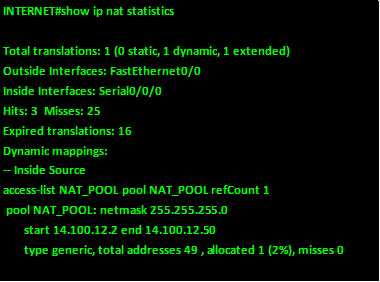
This command is used to verify the number of translation that NAT has carried out. It also shows information on the inside and outside addresses that have been used, the status of translations, such as expired translations, the number of addresses in a NAT pool, as you can see from the output above, only one IPv4 address from the NAT pool has been allocated to an inside host.
Troubleshooting NAT using debug
In some cases, you may have trouble connecting to the internet from your internal network. This may be as a result of problems with NAT. therefore, the troubleshooting of NAT is usually very critical to restoring internet connectivity in our networks. as such, the steps shown below are used to troubleshoot and verify NAT operation towards restoring internet connectivity or ruling it out as the cause of the problem.
Step 1. Identify and define the purpose of NAT in your network. This is meant to review whether NAT accomplishes the tasks it has been configured for.
Step 2. Verification of NAT translations can help identify if the correct IPv4 inside local addresses are being translated into global addresses.
Step 3. Clear the NAT process and used the debug ip nat command to see if the problems are fixed.
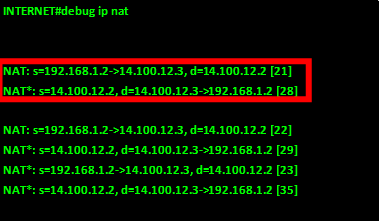
Step 4. This step entails verification of the translations that are occurring on a router actively by using the “debug ip nat” command.
In the second and third line of the output – highlighted in red you can see that the user located on the IPv4 address of 192.168.1.2 sent traffic to a host located on the internet with the public IPv4 address of 14.100.12.2 and his inside local address has been translated to address 14.100.12.3. The host 14.100.12.2 replied to the 14.100.12.3 ip address which is then translated to the address 192.168.1.2, this shows successful NAT translation.
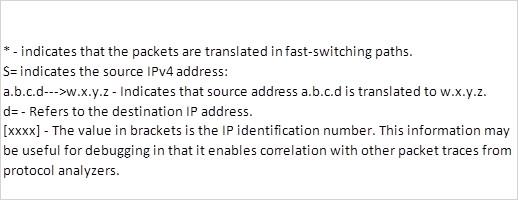
The meaning of the various status messages and values is shown below.
NOTE: troubleshooting NAT is an important element in figuring out whether the internet connection is working. Following these steps will help you successfully verify and troubleshoot NAT. however, always turn off debugging when you are done troubleshooting since debug commands may use up the router’s resources unnecessarily.
Summary
In this chapter, we have looked at the role of NAT in the network. We have discussed the private and public IPv4 addresses and we saw that private IPv4 addresses cannot be used in the internet. Then we discussed what NAT is and looked at the various terminology. We then looked at the ways we can Implement NAT and configured static and dynamic NAT. we finished off with the verification and troubleshooting of NAT.
In the next chapter, we will look at other ip services and cisco IOS services that are important in the network. We will consider the role of high availability in hosts by discussing VRRP, HSRP and GLBP, we will then look at syslog, NTP, and CDP.