


Overview
In the first part, we took a look at link state routing protocols and discussed how OSPF works. We also learnt how to configure OSPF. In part two of this chapter on OSPF, we will look at more concepts such as the OSPF metric, suppression of OSPF updates and redistributing the default route.
OSPF metric
In OSPF, the metric that is used to determine the best path to a destination network is the cost. The cost is a value that is determined by the available bandwidth on a link. This value can be changed so as to affect the metric.
The table below shows the different costs on various links that we can use in our networks.
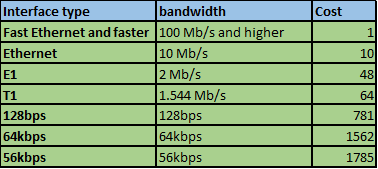
When the metric is being calculated by a router in OSPF, the cost on each link towards a destination network is added up. The cumulative cost is then used as the metric.
The cost of a link in OSPF can be verified using the “show ip ospf interface <interface name> <interface ID>” command.
In some instances, you may want to adjust the cost on a particular link. We can do this using the “bandwidth <interface_Bandwidth>” command in the interface that you want to modify. This will change the bandwidth that will be used to compute the cost by a router. The command structure is as shown below.
Router(config-if)#bandwidth <interface_bandwitdh>
We can also modify the cost by using the “ip ospf cost” command in the interfaces, this will change the cost of the link to the configured value. This command is executed in the interface that you want to change the cost as shown below.
Router(config-if)#ip ospf cost <COST_VALUE>
This command will modify the cost on the link to a specific value. As configured by the administrator.
In part 1, we configured the basic options in OSPF, we will continue with this lab and in this section, we will modify the cost of R1’s serial 0/0 link.
First we need to verify the cost currently on serial 0/0 on R1. We do this using the show ip ospf serial0/0 in the privileged exec mode of R1. The output of this command is shown below.
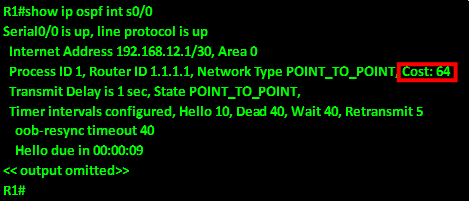
As you can see from the output, the cost of this link is 64. We can confirm that the metric of routes learnt from R1, will have a metric of 64 and above, we will use R1’s neighbor which is R2
. 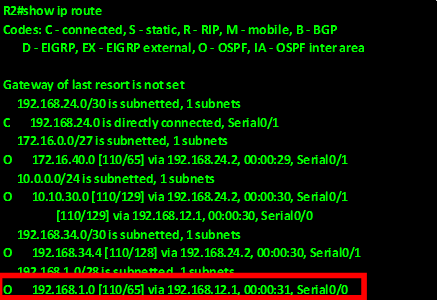
As you can see from the output above, marked in RED, the network 192.168.1.0/28 that was learnt from R1, has a metric of 65. Which is an increment of 1 from the bandwidth configured on this link.
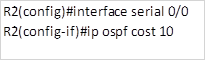
In our scenario, we need to change this to our own cost which in this case will be 10. To configure this, go to the serial 0/0 interface on R1 and enter the following commands.

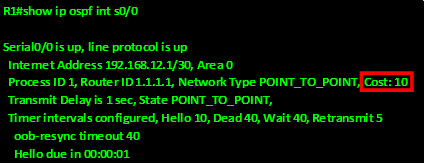
This will specify that the cost of this link should be 10 and not 64. This can be verified using the show ip ospf interface s0/0 command as shown in the output below highlighted in red.
However, a closer look at the routing table shows that R2, is still receiving routes from R1 with a metric of 65. This is because the command has to be executed on both ends of the link so as to work. Therefore, we also need to execute the ip ospf cost 10 command on R2’s s0/0 interface as shown below.
This will make the cost of this link be 10. And based on the routing table of R2, for the network 192.168.1.0/28 which is advertised by R1, the new changes will be reflected as shown in the output below:
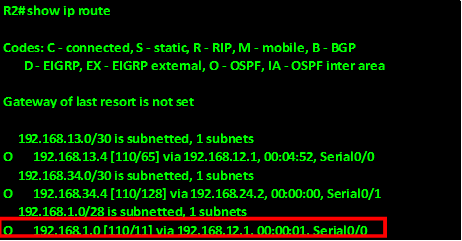
As you can see above, the new metric for the 192.168.1.0/28 route is 11.
The changing of the metric on OSPF links is part of tuning. This is done so as to manually select a preferred path over another.
NOTE: changing the metric is usually not advisable since it may lead to negative results.
Suppressing OSPF updates
In some scenarios, we might need to limit the updates out some of the interfaces. Take our scenario for example.


As you can see in the topology above, we do not need to send routing updates out to the FastEthernet interfaces marked with a red arrow because they are connected to users. This is unnecessary and may be a security risk. To prevent routing updates being propagated to these interfaces we need to configure them as passive interfaces just like we did in EIGRP.
To do this: enter the command shown below in the router OSPF configuration mode on each router.
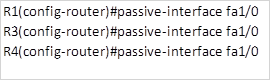
This command when executed will stop OSPF updates being sent out the interface that you have specified.
NOTE: An alternative to this command is configuring all interfaces on a router as passive interfaces, then negating this command on each interface where OSPF updates need to be sent.
Redistributing the default route
In many scenarios, you may need to access other external networks from the corporate network. Connecting to the internet is one of those scenarios, just like in EIGRP, we need to configure a route that directs any unknown traffic to the internet.
In this section, we will redistribute a statically defined route to the OSPF network.
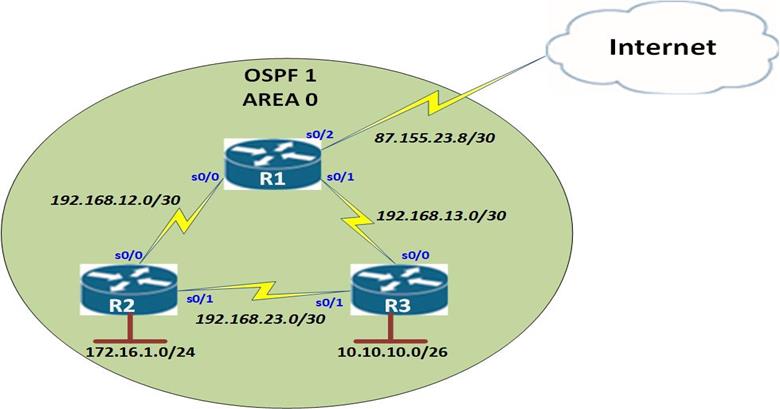
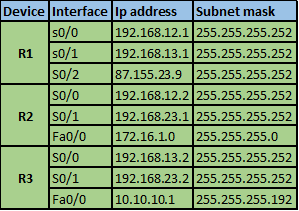
The topology shown below has 3 routers in the OSPF domain and the link on R1 connects the enterprise to the internet. All the routers are in OSPF 1 area 0, R1 is connected to the Internet through the serial 0/2 interface which has been assigned the public ip address in network 87.155.23.9/30.
In this scenario, we are supposed to ensure internet connectivity to all the other routers. This connection will be through R1.
In our scenario, the basic configuration has been done and all the interfaces are active. We will only configure OSPF and the default route to the internet.
The IP addressing scheme in use is shown below .
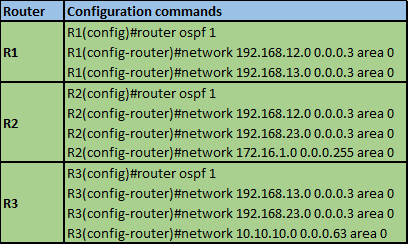
First we configure OSPF on the three routers. The commands for the three routers are shown in the table below.
After the OSPF configuration on all the routers, we need to configure a static default route on R1 towards the internet out serial 0/2, to do this, we use the command:
Ip route 0.0.0.0 0.0.0.0 s0/2 on R1.
After this we can examine the routing tables on each of the routers to see if there are any changes:
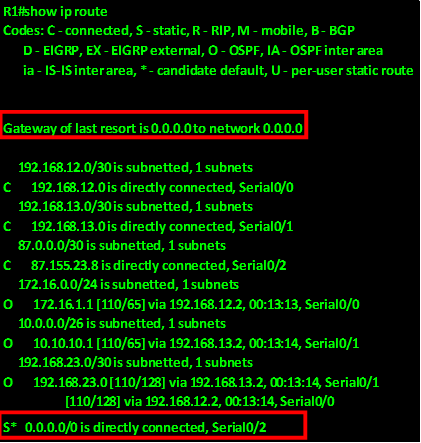
As you can see from the output above of the show ip route command on R1, there is a static default route which is marked by “S*”, at the bottom of the output, further, it is marked as the gateway of last resort, this means that packets that do not match any of the routes in R1’s routing table will be forwarded out the s0/2 interface.
On R2 and R3 however, we still do not have a default route as shown from the ip route output below.
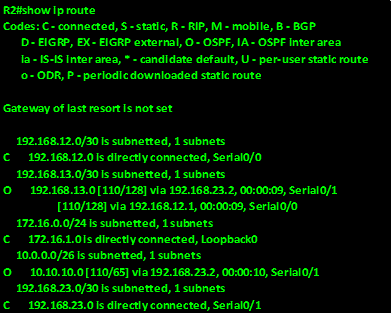
R3’s ip route
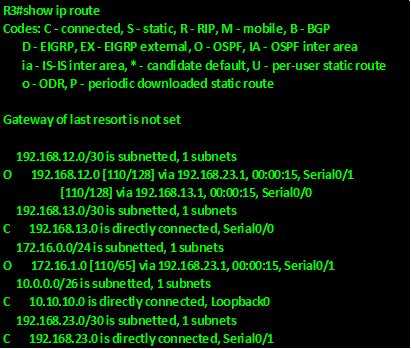
As you can see from the output above, both R2 and R3 do not have a gateway of last resort or a default route. Therefore, we need to redistribute this route from R1 to these routers.
Unlike in EIGRP, the command that is used to redistribute a default route in OSPF is “default-information originate” in the router configuration mode.
On R1, go to the OSPF configuration mode and enter the following command:
R1(config-router)#default-information originate
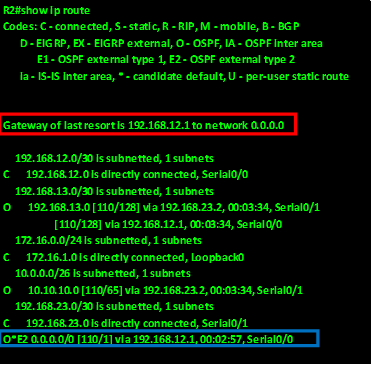
This command will redistribute a configured static default route to all the other routers in the OSPF domain. We can verify this by viewing the routing table on R2. Based on the output below, you can see that the router has learnt of a new network marked as O*E2 highlighted in blue. This means that this route is a type 2 external network that was redistributed into OSPF. Further, we can see that R2 now has a default route as highlighted in the red box.
Summary
This marks the end of part two of OSPF, we have discussed the OSPF metric and how we can modify it, how we can suppress routing updates using passive interfaces as well as how we can redistribute a default route. In the part 3 we will look at multi area OSPF.