


Overview
Ipv6 is one of the most emerging technologies in networks. IPv4 addresses are almost exhausted and as such there is need for a new and better solution. In this chapter on IPv6, which is the last chapter of this CCNA training course we will look at the concepts behind this protocol, we will learn why there is need for IPv6 which will be followed by configuration of IPv6 addresses based on the network requirements. We will finish off by looking at IPv6 routing using OSPF and see how it differs from OSPFv2.
What is IPv6 and why is it important
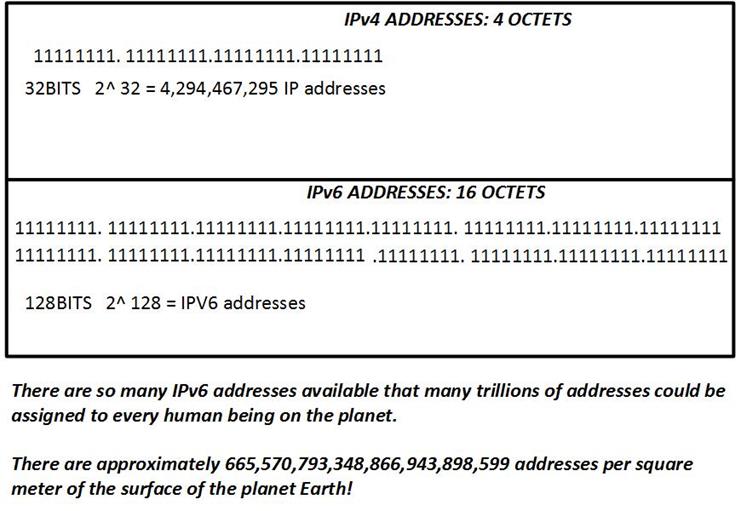
In the chapter on NAT, we discussed the use of IPv4 and we said that the IPv4 address space provides approximately 4,294,967,296 unique addresses. Of these, only 3.7 billion addresses are assignable because the IPv4 addressing system separates the addresses into classes and reserves addresses for multicasting, testing, and other specific uses.
IPv4 addresses are almost exhausted and this is occasioned by the increase in internet use; the number of devices that one can use the internet on these days are many; smartphones, tablets, laptops and other devices can now access the internet. Even with NAT, the rapid growth of the internet is leading to the depletion of IPv4 addresses.
The world now is moving to IPv6 addresses. The figure below shows the difference in number of ip addresses.
Advantages of IPv6
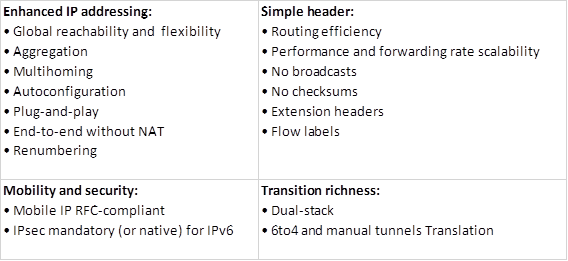
As you can see from the table below, the use of IPv6 brings so many features and possibilities that were previously not available in IPv4.
IPv6 addressing
IPv6 Address Representation
All throughout this course, we have seen that IPv4 address is made up of 32 bits which are divided into four groups of 8bits each and separated by dots. With IPv6 addresses, the 128 bits are too many to be divided into octets, therefore, IPv6 uses hexadecimal units to represent the bits which are grouped into 8 groups of 16 bits each.
The figure below, shows how you can represent an IPv6 address as well as how to shorten it using the rules shown below it.
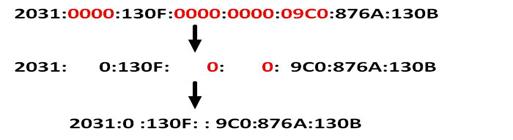
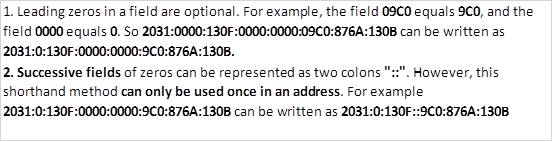

When the router gets an IPv6 address with the two colons “::“, it can be able to calculate the number of missing 0’s by filling the address with 0’s until the address is complete by making it 128bits. However, if you were to put the two colons twice, the router would not be able to know how many 0’s are in which group.
IPv6 Global Unicast Address
These addresses that can are assigned by ISPs, these first 48 bits of these IPv6 addresses is usually a global prefix for routing. An organization can then use a 16 bit subnet they have been assigned to address the hosts in their networks.
Link-local addresses
These addresses are used only in a particular network. When routers receive link-local addresses, they do not route them even if it is internally. These are used to communicate within a particular network segment. The link local addresses are the replacement to broadcast addresses.
IPv6 Address Management
With IPv6, the hosts do not need to be configured with the entire address, they only need to be given a certain address portion, they can then use the MAC address to derive the full IPv6 address.
With IPv6, you can assign addresses in either of the following ways:
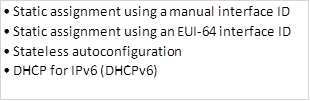
Manual assignment
With manual assignment, you can configure an interface with an IPv6 address as you would an IPv4 address. However, with IPv6, we can use the “slash” notation to specify the prefix length that denotes the network. The command used in the interface configuration mode to manually assign an IPv6 address is:

An example of this is:

NOTE: one major difference in IPv6 address from IPv4 is that the subnet mask or prefix mask can be entered in slash (/) notation.
EUI-64 Interface ID Assignment
In this type of configuration, the network administrator, assigns an interface with the network portion of the IPv6 address and tells the interface to derive the rest of the IPv6 address from its MAC address.
The command needed to configure this type of IPv6 address assignment is:

An example of this is:

Stateless Autoconfiguration
with this type of configuration, the router assumes that the user nodes need access to the network, therefore, it allows these devices to automatically derive an IPv6 address from the router without additional configuration.
DHCPv6 (Stateful)
With this configuration, we assign IPv6 addressing information from a configured pool of addresses as we would with DHCP for IPv4.
IPv6 Transition Strategies
When an organization wants to move from IPv4 to IPv6, there are several ways that they can do this without changing old equipment or changing the operation of the network drastically. Some of the ways that this can be achieved are shown below:
Dual Stacking
With dual stack, you can use both IPv4 and IPv6, this involves activating both protocols on the network devices. With this mode however, IPv6 will always be preferred over IPv4.
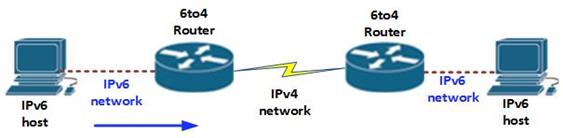
Tunneling
With tunneling, we can encapsulate an IPv6 packet inside an IPv4 packet, this is so as to make the IPv6 packet traverse a network that may still be using IPv4. This is shown below.
There are several ways that tunneling can be done:
In manual tunneling, an IPv6 packet is usually encapsulated inside an IPv4 packets.
With dynamic 6to4 tunneling, the router establishes connections to IPv6 islands which are located on an IPv4 network. With this method, the organization must be assigned an IPv6 addressing space for it to work.
IPv6 transition mechanisms
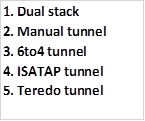
NOTE: the IPv6 transition mechnaasims are often asked in the CCNA exams, therefore you should know these mechanisms as well as how they work. Teredo and ISATAP are beyond the scope of this course.
In the next section, we will look at IPv6 routing using OSPF, OSPFv3. We will also do configurations in IPv6, dual stack.
IPv6 routing (OSPFv3)
In this first part, we are going to configure IPv6 in dual stack mode and also configure static routes. The topology shown below will be our Lab for this section.
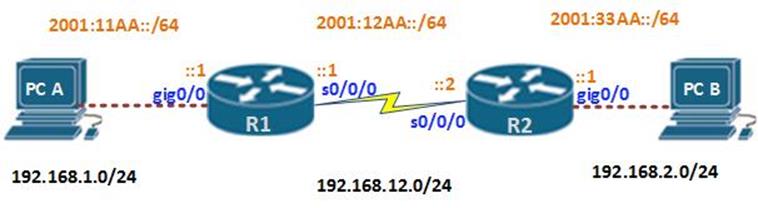
In this lab the IPv4 addresses have been assigned as well as static routing in IPv4, our task is to configure IPv6.
Dual stack
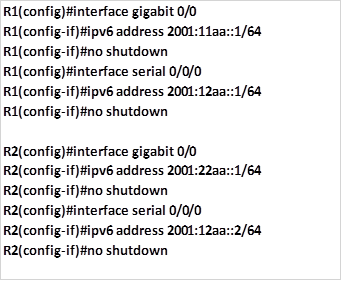
Step 1. Assign IPv6 addresses to the gigabit and serial interfaces.
The command we will use in this case is:

The following are the commands that have been used to assign IPv6 addresses to the interfaces in the network.
Now that we have assigned IPv6 addresses to the interfaces, we can verify that they are operational. For this we will use the:
Show ipv6 interface brief and ping ipv6 <ipv6address> commands and this output is shown below for R1.
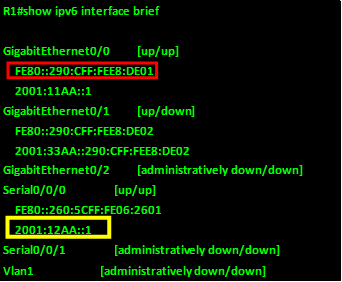
As you can see from the output above, the “show ipv6 interface brief” command is slightly different from the show ip interface brief command we use for IPv4, however, the output shows the status of the various interfaces, as well as their IPv6 address information.
NOTE, we have two ipv6 addresses for each link. One is the link local address and the other one is the global address that we assigned to the interface. The link local is highlighted in red while the global is highlighted in yellow.
The ping ipv6 command output is shown below.
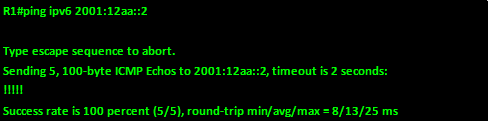
As you can see from the output, the pings are successful.
NOTE: when using dual stack, IPv6 addresses will be preferred over IPv4 addresses.
In the next section, we will configure static routes.
Static routing in IPv6
To configure static routes and default static routes in IPv6, the command structure is the same as that for IPv4.

For example, to configure a static route for the two LANs, the commands we use are:

The static default route is probably the easiest route you can configure: the command used is:

To verify these routes, we can use the “show ipv6 route” command, as shown in the output below for R1.
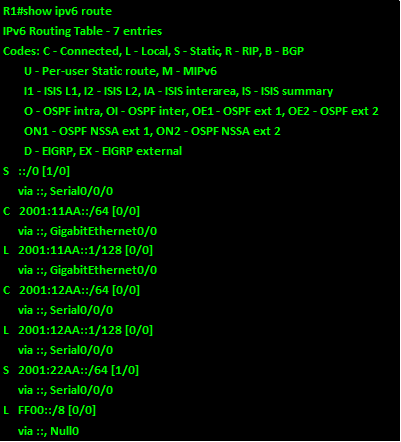
As you can see from the output above, the output is slightly different from that of IPv4 show ip route command. However, the routes are shown as either statically configured, local or connected.
OSPFv3
OSPFv3 is the implementation of OSPF in IPV6. In this section, we will configure both single area and multiple area OSPFv3.
OSPFv3 single area
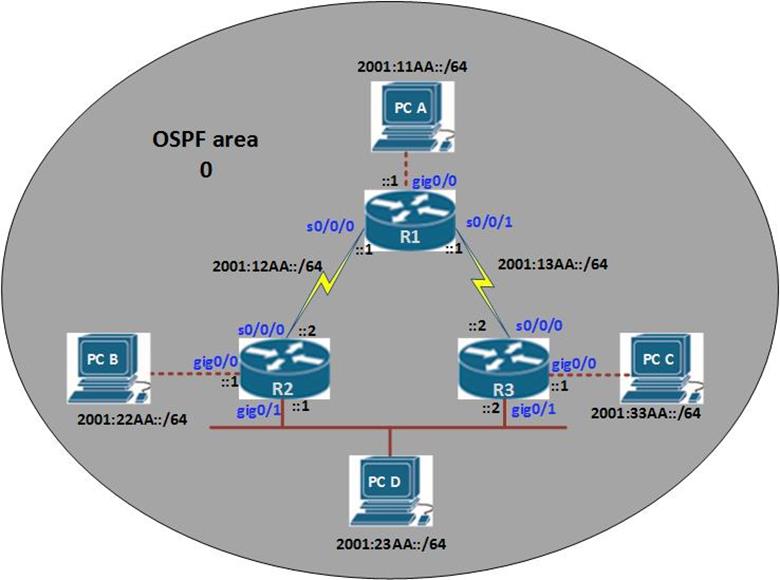
In this topology, we have 3 routers, and four hosts. There are 6 networks and the network between R2 and R3 is a shared Ethernet link. We will be configuring OSPFv3 in this topology.
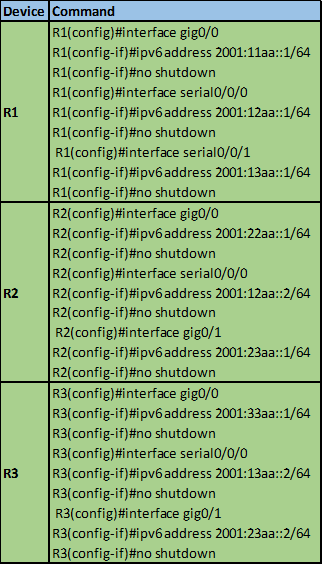
Step 1. Configure IPv6 addresses according to the network diagram above.
The table below shows the ipv6 addressing commands on all the routers in the diagram.
Now that we have assigned IPv6 addresses, on all the devices including the hosts, we can configure the OSPFv3.
Step 2
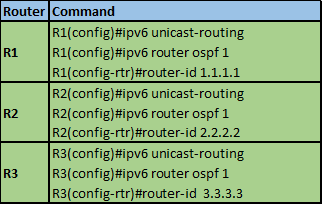
The first command we will use is the command to activate IPv6 routing.
REMEMBER: IPv6 routing is not enabled on CISCO routers by default therefore we have to issue the command: “ipv6 unicast-routing” in the global configuration mode to enable routing in IPv6.
The second command which we will issue in the global configuration mode is “ipv6 router ospf <process_ID>”
In OSPFv3, the link local are used to carry OSPF messages. OSPF runs in the interfaces and we do not configure the network statements.
In OSPFv3, we still use the IPv4 router-ID which we configure in the router ospf configuration mode.
Router(config-rtr)#router-id <ipv4_router_ID>
NOTE: for OSPFv3 to work, this series of command must be configured first.
The commands we have just discussed below are shown below for the three routers.
Step 3
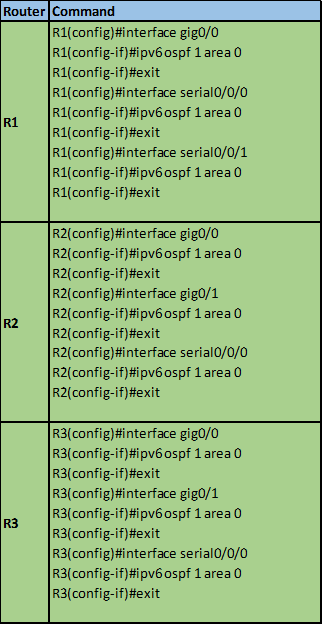
The third step is to configure the network statements.
Unlike in OSPFv2, which is OSPF for IPv4, in OSPFv3, we configure the network statements in the interfaces. This is an important new feature, in essence, we no longer need passive interfaces.
To advertise networks in OSPFv3, we need to go into the interface configuration mode and enter this command.
Router(config-if)#ipv6 ospf <process_ID> <area> <area_ID>
In this case, this is the only command we need to advertise networks in OSPFv3. The commands we use in our scenario are shown below.
With this we have configured OSPFv3 in a single area. This we can verify using the show command shown below.
Show ipv6 ospf neighbor
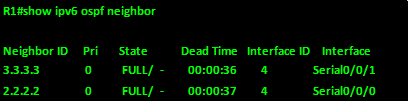
This command can be used to view the neighbor relationships in OSPFv3. As shown above, R1 has formed two neighbors as expected.
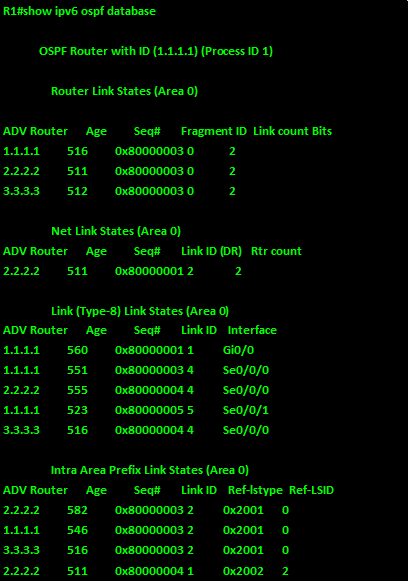
Show ipv6 ospf database
This command will show the “map” that OSPF has and all the routes that it knows.
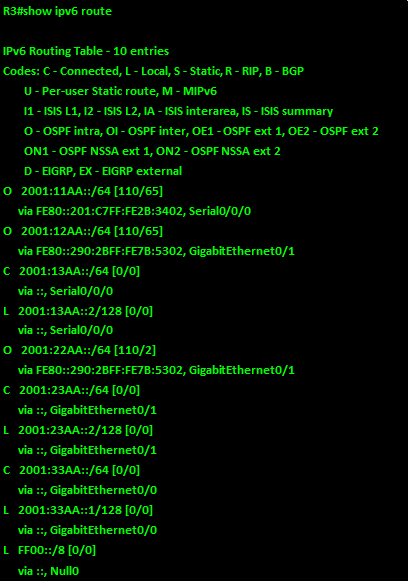
The last command we will look at is the show ip route command.
Show ipv6 route
As in IPv4 this command will show us all the routes that a router knows of.
As you can see from the output below for R3, all the OSPF routes are marked as well as all other routes on this router.
In the next section we will configure OSPFv3 in a multi-area scenario.
OSPFv3 multi-area
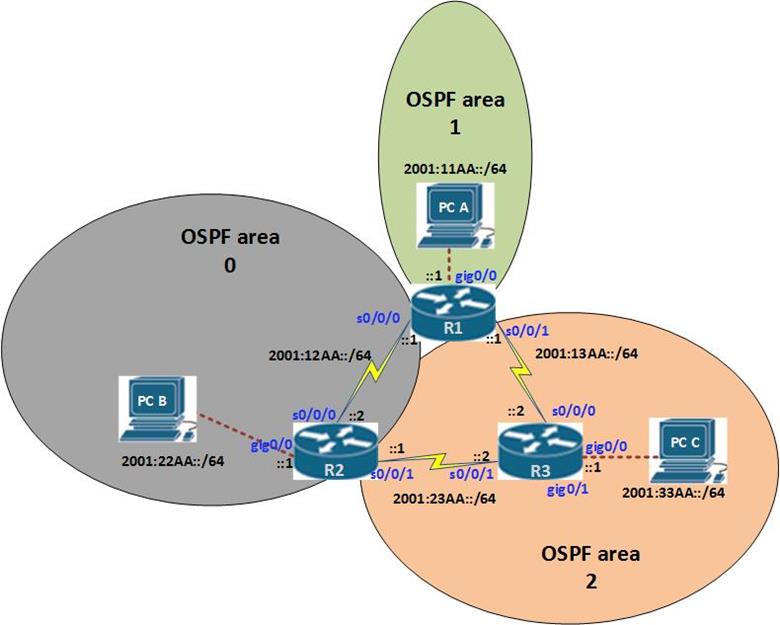
In this scenario, we are going to configure multi-area OSPFv3 according to the topology diagram shown above.
In this scenario, the configuration options are almost similar to those of single area OSPF, the only difference is that we will be advertising the interfaces in different areas. This is shown in the table below for the three routers.
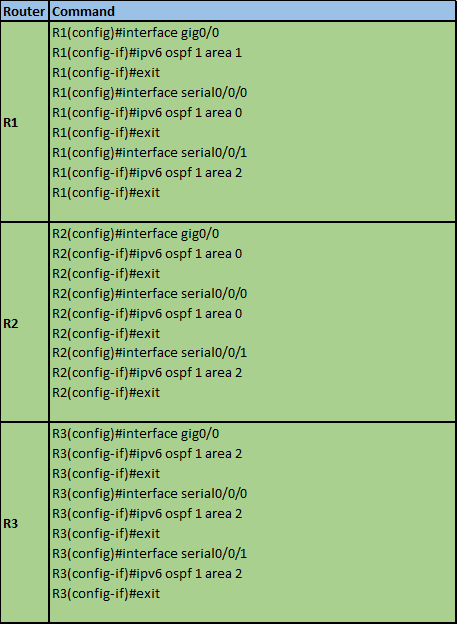
REMEMBER: when implementing OSPF multi-area at least 1 router must have an interface in Area 0.
To verify the routes, we will use the show ipv6 route command on R3 as shown below.
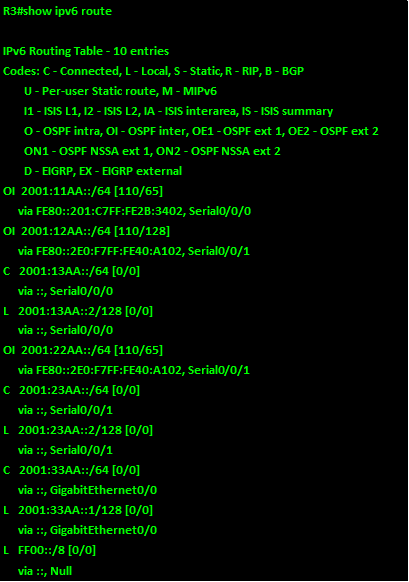
As you can see from the output above, OSPF routes are in the routing table, including the inter area routes shown by “OI”
With the configuration of OSPFv3, we have come to the end of this chapter on IPv6.
Summary
In this chapter, we have looked at IPv6 concepts, we started by discussing why we need IPv6, we then looked at the IPv6 addressing concepts, we then configured dual stack and saw that it is when we run both IPv4 and IPv6. Next we configured IPv6 static routes and static default route. This was followed by configuring OSPFv3 which is the IPv6 version of OSPF.
In this course, we have looked at all the areas that you as a CCNA should know. This course is meant to help you in your journey towards gaining the CCNA certification. To be better prepared, study this material repetitively, follow along as I do the lab configurations, and where you go wrong, take a moment and review where you may have gone wrong.
Along this course material, you will be provided with labs on all the chapters in the CCNA curriculum. Good luck.