


Overview
In part one of this chapter, we looked at the ACL concepts, we discussed how they worked and we topped it off with configuration of standard ACLs. In part 2, we will discuss extended ACLs and other ACL concepts, we will then configure extended ACLs and finish off with troubleshooting ACLs.
Extended ACLs
With standard ACLs, we cannot filter traffic with great efficiency because the only criteria is the source address. For more control and flexibility, the use of extended access control lists is ideal. As we mentioned earlier, extended ACLs, look at more than the source IP address. Some of the configuration options we can have include:

In part 1 we said that the standard access lists range from 1 – 99, with extended ACLs ranging from 100 – 199.
The command syntax for configuring extended ACLs is shown below.

The operator is a keyword that compares source and destination address. They include:

NOTE: the operator keyword can only be used on certain protocols such as when UDP or TCP is used.
The statement below shows an example of an extended ACL.

As we mentioned in part 1 of this chapter, maximum effectiveness of extended ACLs is when they are used as close as possible to the source network.
In the next section, we will configure extended ACLs using the topology we had in part 1 but with different instructions.
Configuring extended ACLs
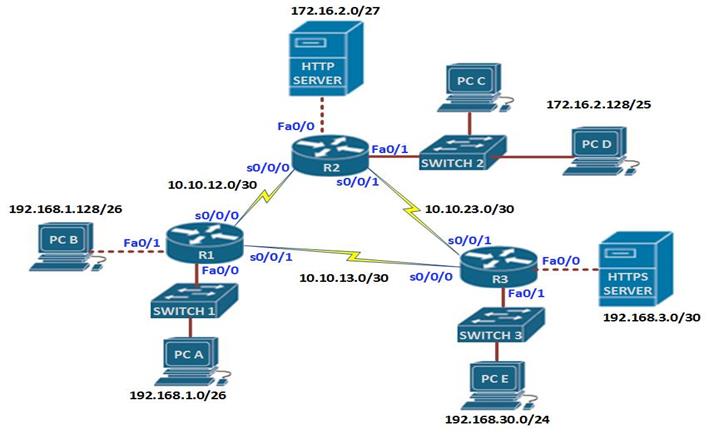
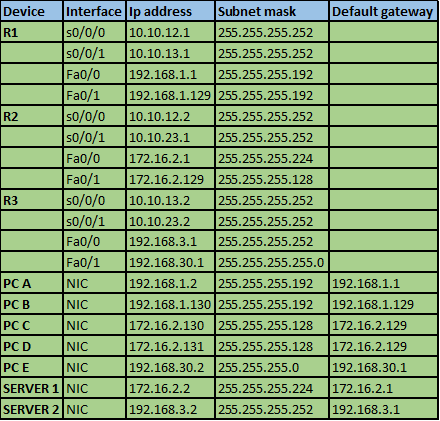
The IP addressing scheme is shown in the table below for all the devices in the network.
Scenario
Unlike in part 1 where the configuration was limited to the source ip address, in this configuration, we will include other parameters, however, the basic configuration should be the same as before.
In this scenario, you have been asked to configure ACLs based on the items on the security policy as listed below.
- Users on 192.168.1.0/26 network should not be able to access PC E.
- Users on network 172.16.2.128/25 network should only be able to access the HTTP server.
- PC A should not have access to secure web services.
- PC A can use telnet while PC B cannot use telnet.
- Users on network 192.168.30.0/24 should not be able to ping the HTTP and HTTPS servers but they should be able to access websites.
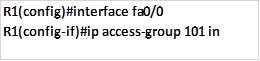
Task 1. Users on 192.168.1.0/26 network should not be able to access PC E.
This access list should limit traffic to PC E only while allowing all other traffic from users on this network. The commands needed to accomplish this are:

This access list denies any ip traffic from network 192.168.1.0/26 that is destined to PC D.

This command allows any other traffic to traverse the network.
Extended ACLs should be applied closest to the source network so that the router does not need to process packets that will be dropped. Thus, we will apply this ACL to the interface connected to 192.168.1.0/26 LAN in an inbound direction. This will ensure R1 drops any packets it receives with a destination ip address of PC D, while allowing all other traffic.
The command needed to apply this ACL to interface FastEthernet 0/0 inwards is shown below.
Task 2. Users on network 172.16.2.128/25 network should only be able to access the HTTP server.This task can be easily accomplished by only allowing network 172.16.2.128/25 access to the HTTP server on R2. It should drop all other traffic.

The command shown above permits access to the HTTP server by users in network 172.16.2.128/25. Since this scenario does not say that we limit traffic to just HTTP traffic, we will allow all traffic.

The command above is used to apply this ACL to the inbound interface connected to the 172.16.2.128/25 network. In the second task, we have only used one ACL statement. Traffic to other destinations other than the HTTP server will be blocked because of the implied deny statement.
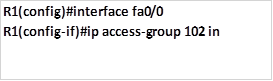
Task 3. PC A should not have access to insecure web services.
This task shows how we can apply filtering of traffic based on ports. Web services are accessed using port 80 for HTTP and port 443 for secure HTTP (HTTPS). This task dictates that we block only secure web services, therefore, we will only block port 443 for PC A. this will be configured on R1, using the commands shown below.

This ACL will be applied inbound on R1’s fastEthernet 0/0 interface as shown below.
Task 4. PC A can use telnet while PC B cannot use telnet.
This task needs us to deny telnet traffic on these two PC’s. we need to block PC B from using telnet (port 23) the command shown below is meant to accomplish this:

Applying the ACL to the interface:
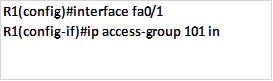
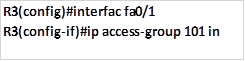
Task 5. Users on network 192.168.30.0/24 should not be able to ping the HTTP and HTTPS servers but they should be able to access websites.
This task is very tricky and it examines understanding of protocols. The protocol that makes pings possible is ICMP. In this task, we should block ICMP traffic from getting to the HTTP and HTTP servers, while allowing all other traffic. The commands needed to accomplish this on R3 are:
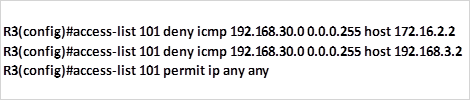
The first two commands will block the specified traffic which in this case is ICMP, the third command will allow traffic from other protocols and ports to go through the network. The command shown below is used to apply this ACL to the interface that is closest to network 192.168.30.0/24.
NOTE: in this lab, we have taught you how to configure the various types of ACLs. However, you should be careful when configuring and applying ACLs. As mentioned earlier, writing down the configurations command on an application such as notepad is a good way to ensure that you have the correct commands. When you are given a scenario, you should write all the configuration commands before you execute them since ACLs do not allow for modification after they have been configured.
Named ACLs
There are other types of ACLs that you can configure. Using numbers is not descriptive of the ACL that has been configured and as such, named ACLs are a better way to keep track of all the configurations. Standard and extended ACLs both support named ACLs. The commands shown below show the structure that is used to configure named ACLs.

After executing the command above, the ACL configuration mode is enabled and from here you can configure your permit and deny statements as shown below:

Applying these ACLs is the same as for numbered standard ACLs with the only difference being that the access group number is replaced with the ACL name as shown below.

NOTE: these rules are the same for extended ACLs although the keyword in the first command changes from standard to extend.
Complex ACLs
Complex ACLs are usually a way to enhance the functionality of either standard or extended ACLs. Some of the complex ACLs include the following.
- Dynamic ACLs – they are used to authenticate users who send packets through the router by requiring them to connect to the router using telnet.
- Time-based ACLs – these ACLs control traffic based on time parameters that may be set. For example, you may want to limit access to the internet on a particular day of the week.
Verifying and troubleshooting ACLs
ACL configuration can be a complex task, there are several commands that can be used to verify the operation of ACLs. However, in this chapter, we will focus on two commands and then other ways that can be used will be mentioned.
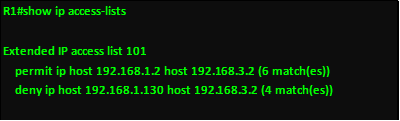
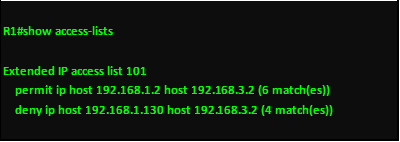
Show access-lists and show ip access-lists
These commands show the configured access lists and filtering that each ACL configured has performed. In the output below, the access lists that have been configured are shown using both show commands. As you can see from the output, when traffic is filtered, the router shows the number of matches at the end of the statement.
The “show running-config” command is also vital in verifying ACL configuration. Verification and troubleshooting of ACLs can be done using the various hosts. When an ACL is configured to block certain types of traffic, correct configuration is verified when the operation is as expected. For example, if I configure an ACL that blocks web traffic from host A but allows web traffic from Host B, correct configuration would be verified if A cannot view websites but B can.
NOTE: the verification and troubleshooting of ACLs is based on careful configuration, when all the principles that have been discussed in this chapter are considered, then you should not have errors, also make sure you write down the configuration commands on an application such as notepad so as to make sure that all the commands will be correct.
Summary
In this chapter, we have discussed ACLs in detail. In part 1, we learnt the concepts behind ACL operation, we then configured standard ACLs. In part 2, we have discussed Extended ACLs and how they allow for greater control and flexibility in managing traffic. We’ve also learnt how to configure and troubleshoot ACLs. In the next chapter, we will look at DHCP and discuss its role in the network.