


Overview
Ip addressing is a very important job network administrators have to accomplish, configuring ip addresses on routers, and other devices can be a challenge especially when the number of devices is many. In this chapter, we will discuss a solution to ip addressing of hosts which is DHCP. We will look at the concepts of DHCP such as its operation, and then configure and troubleshoot DHCP.
DHCP
In our networks, all end user devices need an IP address to access the network. Static IP addresses are usually assigned to routers, management interfaces on switches, servers and other devices in the network which do not change location either physically or logically. Static IP addresses are also used to access and manage these devices remotely.
On the other hand, user devices such as computers, smartphones, IP phones and others are likely to change their locations either physically or logically. This means that assigning them static IP addresses would be an unviable solution.
DHCP is a protocol that was invented to address these problems. With DHCP, we can assign IP address information to user nodes automatically which saves on the administrative overhead that would be involved in assigning IP addressing information to clients statically.
Consider the network topology shown below.

In this network, there are two routers, 2 LANs and 100 user PCs in each network. Configuring IP addresses for the router interfaces would not be a daunting task, but can you imagine what it would be like to configure static IP addresses on each of the PCs. This would definitely be a daunting task.
The enormity of configuring all these IP addresses is increased by the possibility that these users could be in different locations. DHCP is a solution to these problems.
DHCP Operation
Assigning IP addressing information to user devices is one the most important task that is performed by the DHCP servers in our networks. It accomplishes these tasks in one of three ways:
- Manual IP allocation – in this type of DHCP allocation, the network administrator assigns users with IP addresses from the DHCP server and then the DHCP server communicates this information to the clients.
- Automatic IP allocation – in this mode, the DHCP server assigns static IP addresses to clients from a pool. These addresses do not change unless the administrator configures it differently.
- Dynamic IP allocation – in this mode, the administrator configures a pool of addresses which can be assigned to clients. The clients then request the IP addressing information from the DHCP server and they are given an IP address and other addressing information for a particular time period, when the time expires, the IP address is returned to the DHCP pool and the client has to request another IP address.
In the CCNA course, we will learn about dynamic allocation of ip addresses, you will learn more on the other ways DHCP can assign ip addresses in more advanced courses.
When a PC is connected to a DHCP server, the DHCP server usually gives it IP addressing information. The PC can use the IP addressing information it has been assigned until the specified lease period expires.
The figure below demonstrates the DHCP process between a client and a DHCP server.
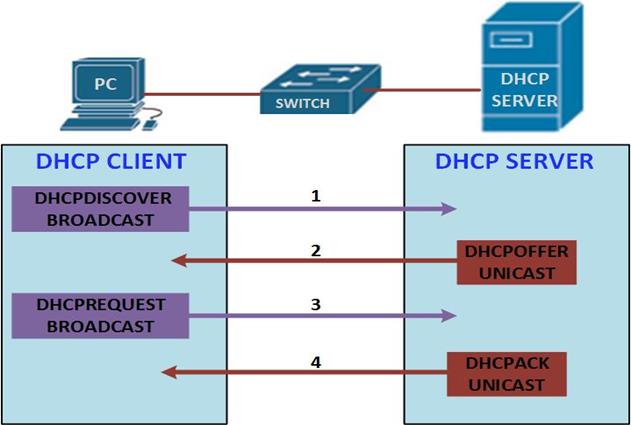
- DHCPdiscover
When the clients boots up, it first sends a broadcast message to try and discover if there are any DHCP servers. Because the client does not have a configured IP address at this time, it uses the global broadcast address to communicate.
- DHCPoffer
When the DHCP server gets the message from the client, it looks in its pool to find an IP address it can lease out to the client. It then adds the MAC address information of the client and the IP address it will lease out to the ARP table. When this is done, the server sends this information to the client as a DHCPOFFER message. This message is usually a unicast since the server already knows the MAC address of the client.
- DHCPrequest
When the DHCPOFFER message is received by the client, it sends a message back to the DHCP server requesting more information on the IP address lease time, and verification. The message that is sent is a DHCPREQUEST, this message tells the server that it will accept the IP addressing that was sent, as well as to check if the IP address that was sent by the server is still valid.
- DHCPACK
When the DHCP server gets the DHCPREQUEST from the client, it confirms the lease and creates a new ARP mapping with the IP address it assigned to the client and the client’s MAC address. It then sends this message as a unicast to the client as a DHCPACK message.
When this message is received by the client, it adds the addressing information and maps the IP address to the MAC address in an ARP lookup.
When configuring DHCP, there are four parameters that are needed by clients before they can communicate fully on the network. These are:
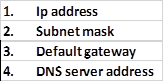
The DHCP server usually assigns all this information to the client for a specific period of time.
In the next section, we will configure a DHCP server using a CISCO router and a few client PCs.
Configuring DHCP
In this configuration lab, we will configure a DHCP server using a CISCO router and see how it assigns addresses to clients as we discussed in the previous section.
The router’s interfaces as well as the HTTP server will be configured with static ip addresses. The HTTP server is also acting as the DNS server.
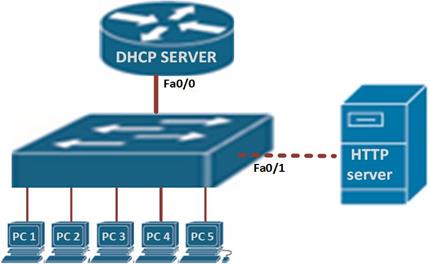
The topology shown below, consists of a single router, a switch, and a couple of host devices. In this lab, we will have 5 hosts which are PCs and a web server.
NOTE: in case you do not have all the devices that are needed, you may do with one or two hosts, or you may simulate this lab in a program such as packet tracer.
Configuration tasks
Step 1. Write down a range of IP addresses that should not be allocated by the DHCP server. In most cases these are the statically assigned IP addresses that have been configured.
Step 2. Create a pool of assignable IP addresses using the command “ip dhcp pool” in the global configuration mode.
Step 3. Configure the information that is needed in the pool, such as the default gateway, subnet mask, domain name.
In this lab, the ip addresses that have been statically assigned are shown in the table below. The router and the web server have also been configured with all other options and our task is to configure the tasks shown above.

The server is connected to the FastEthernet 0/1 interface on the switch and it has been configured with an ip address as shown above.
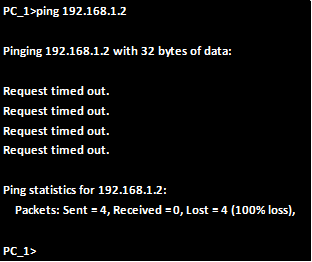
The first thing we need to do is verify whether the hosts have ip addresses and can ping the server. To verify ip address configuration, we use the command “ipconfig” on the PCs and as you can see from the output below, PC 1 does not have an ip address, subnet mask or default gateway.
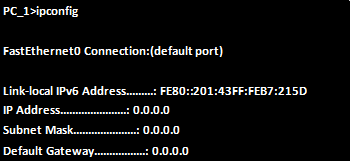
This means that pings to the server will be unsuccessful as shown in the output below.
Step 1. Exclude ip addresses configured on the router’s interfaces, switch management interface and server from DHCP.
The devices we will exclude from participation in DHCP have been configured with static ip addresses. It is highly unlikely that these devices will be moved any time soon and also statically configured ip addresses on these devices helps in troubleshooting when there is a problem.
When configuring the DHCP pool, we need to specify addresses that should not be leased out to clients in the network. These are the addresses that have been statically assigned to network devices such as router interfaces, switch management interfaces, among others. to exclude the statically configured IP addresses, we use the command shown below.

In this case:

This will ensure that the ip addresses shown above will not be in the DHCP pool.
NOTE: when excluding IP addresses, we should also account for expansion in the future.
Step 2.
Create the DHCP pool
The DHCP pool contains all the addresses that can be assigned to hosts. In this case, we use the command:

When this command is executed, the prompt changes to the DHCP configuration mode which is denoted by the prompt shown below. In this mode, we can configure the DHCP parameters that we need:

In our scenario, this is shown below:

In this mode, we can configure more DHCP options such as defining the pool ip addresses, lease time and other options.
Step 3. Configure the specifics of the pool
The tasks we will configure in this lab are:
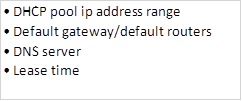
DHCP pool
The DHCP pool is the range of ip addresses that the hosts in the network can request, the command needed to configure the DHCP pool ip addresses is shown below.

In our scenario, this command is shown below.

Default gateway/default routers
The default gateway is used by hosts for delivery to remote networks, in this case the default gateway is the ip address that is configured on the router’s LAN interface. The command needed to configure the default routers in DHCP is:

In our lab this will be:

DNS server
The DNS server, is used to resolve ip addresses to hostnames. The command needed to configure DNS server is:

In our scenario, we have used the web server as the DNS server and the command we use is:

Lease time
The lease time specifies how long a client can have an ip address before it has to make a new request. The lease time is configured using the command:

In our scenario, this command will be as shown below

This specifies that the clients will have to renew the DHCP configuration once every three days.
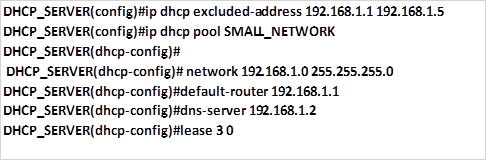
The commands we will use in our scenario to configure DHCP are shown below.
Configuring DHCP on a client
On a DHCP client, we need to specify that the ip configuration will be obtained using DHCP. This is accomplished in the interface configuration on the client. This is the default operation of many PC’s however, you may need to verify it.
Verifying DHCP configuration
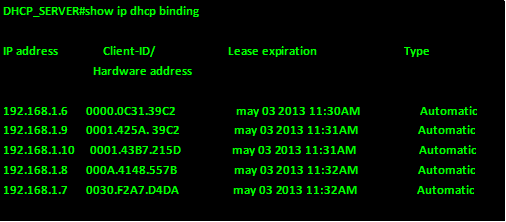
To verify the operation of DHCP on a router, use the “show ip dhcp binding” command. This command displays a list of all IP address to MAC address bindings that have been provided by the DHCP service as shown below.
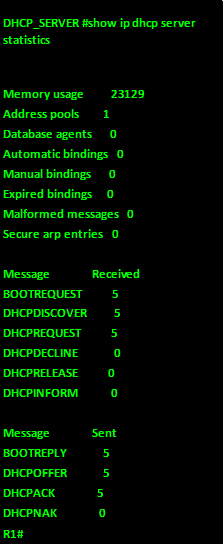
To verify that messages are being received or sent by the router, use the “show ip dhcp server statistics” command. This command displays count information regarding the number of DHCP messages that have been sent and received. The output of this command on our router is shown below.
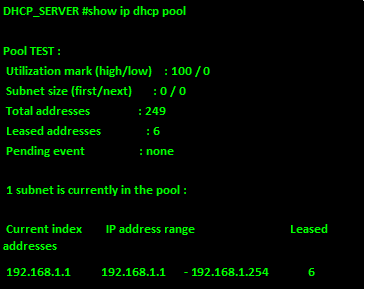
The command “show ip dhcp pool” will show the configured DHCP pools on the router as shown below.
Another good way to verify DHCP operation is by checking whether the clients in the network have obtained ip addresses and other configuration options in DHCP. The output of the “ipconfig” on PC 1 which did not have any ip address at the start of this lab is shown below.
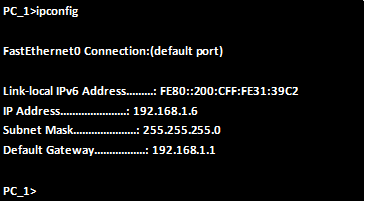
As you can see from the output above, PC 1 now has ip configuration information. On windows PCs, using the command “ipconfig/all” will show the other configuration items.
DHCP relay
In many enterprises, the DHCP server will most likely not be the router and it will be located on a server farm. This may be a problem for clients who want to get IP addresses.
An IP helper address is a solution that enables routers in the network to forward DHCP broadcast messages from the local network to a DHCP server that may be in a different network. In this situation, the router usually relays requests to the DHCP server which then can communicate IP addressing information to the user devices.
The commands needed to configure the router as a DHCP relay is shown below.

In this case, the interface that the command is used in is the interface connected to the LAN.
Troubleshooting DHCP operation
To troubleshoot DHCP, a number of steps should be followed.
Verify the running configuration
This should be done so as to make sure that the DHCP pool configuration is correct as it was designed. All commands should be checked.
Verify physical connectivity
This can be overlooked, verifying that the client as well as the router’s LAN interfaces are operational would help determine the problem.
Configure static ip on client
When the client is not receiving ip address configuration from the DHCP server, you may want to configure it with a static ip address and then try to ping the DHCP server. This would establish whether the client or the server has the problem.
You may also want to renew the DHCP on the client so as to see whether it will receive ip addressing information from the server.
NOTE: configuring DHCP is a very important task network administrators should know. Careful configuration would lead to correctly assigned ip addresses on clients.
Summary
In this chapter, we have discussed the role of DHCP in the network. We have seen that it eases configuration on the clients and eases the administrative overhead. We configured and verified DHCP on the lab and learnt how we can go about troubleshooting DHCP. In the next chapter, we will look at another ip addressing service which is NAT.