


Welcome to part 2 of addressing in ipv4. In part 1 we looked at how IP addresses are assigned in ipv4. We looked at the various types of ipv4 addresses and we also did basic subnetting. In part 2, we will continue subnetting and introduce a few more concepts.
Classful addressing in ipv4
When IPv4 addresses were introduced, the standard was based on classes on the RFC 791 standard. There were three classes that were introduced and this was based on requirements of companies at the time; class A was for large organizations, class B for medium size enterprises and class C for small organizations.
The table below shows the different classes in ipv4.
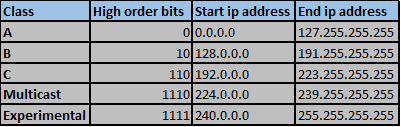
Class A addresses start with a 0 bit, and they range from 0.0.0.0 to 127.255.255.255 the first address which is 0.0.0.0 with a subnet mask of 0.0.0.0 is reserved for default routes. This will be discussed in a subsequent chapter.
Class B IPv4 addresses start with the high-order bits of 10. Their range is shown above.
Class C IPv4 addresses start with two 1bits and one 0 bit. They range from 192.0.0.0 to 223.255.255.255.
The remaining IPv4 address ranges were reserved either for experiments or for multicasts. However, with classful IPv4 addressing there were several problems. For example, suppose a company only required 100 hosts and they were assigned a class B ip address range, this would mean that there would be very many wasted IP addresses that would bring problems in expansion and future use of IPv4 addresses. To address this, classless IPv4 addressing was introduced.
Classless ip addressing
Classless IPv4 addressing is a solution to the wastage of ip addresses occasioned by classful addressing. The Classless Inter-Domain Routing (CIDR) addressed this problem with the use of the subnet mask instead of the number of high order bits.
CIDR AND VLSM
With CIDR, the use of variable length Subnet Masks (VLSM) is possible. The VLSM is used to allocate IP addresses based on the needs of the organization as opposed to the class. The networks can also be subdivided into smaller parts based on the organization’s internal needs.
In this chapter, we will discuss sub subnetting and suppernetting, in future chapters, we will cover route summarization when we begin routing.
Subnetting continued
As we have seen in the concepts discussed above, it is possible to subnet a subnet. In most of this section, we will learn how to subnet subnets to fit the particular needs that we may have in our organizations.
Take the ip address 192.168.1.0/24 we will sub-subnet it to see how we can effectively assign IP addresses to hosts.
Subnetting a subnet
In this section, we will look at how we can subnet a subnet. This is part of VLSM.
In this scenario, we have been given the ip network 192.168.1.0/24, our task is to subnet this network according to the requirements.
Subnet 192.168.1.0/24 to give 6 subnets with 1 subnet with 125 hosts, 1 subnet with 60 hosts, 1 subnet with 30 hosts and 3 subnets with 2 host ip addresses.
Task 1. 1 network with 125 hosts
We need to calculate how many right hand side bits we need, then the rest will be allocated to the network portion.
2^n=125 – 2
2^7=128
128-2 = 126
Therefore, we only need 7 host bits. 1 bit will be in the network portion.
The new subnet mask after we add 1 bits to the network portion will be:

192.168.1.0/25
Therefore, the increment will be 128. In this case the first network will be 192.168.1.0/25

The second network will be 192.168.1.128/25 as shown below

These will provide enough host ip addresses for 125 hosts which is task 1.
Task 2. 1 subnet with 60 hosts
In task 1, we have assigned the network 192.168.1.0/25 to the first network, this means that we have 192.168.1.128/25 to work with. This subnet needs to be subnetted to give 60 hosts ip addresses.
Therefore, we need to calculate how many host bits we need to accommodate this.
2^n-2= 60
2^5- 2=30, this is less than 60 therefore it will not be adequate.
2^6-2 = 62. This therefore will be enough for the hosts in LAN A.
The host bits will be 6 and we will borrow 2 host bits to get these new networks.
The new subnet mask for the 192.168.1.128/25 network after subnetting will be:

255.255.255.192
NOTE: in the first task, we remained with the second subnet which is 192.168.1.128/25, therefore, the new subnets have to come from this subnet.
The increment number will be 64, therefore the 2 networks will be:
- 192.168.1.128/26
- 192.168.1.192/26
The first network after subnetting will be assigned to the network which requires 60 hosts. i.e, 192.168.1.128/26. The second subnet will be subnetted further according to task 3.
Task 3. 1 subnet with 30 hosts
We need 30 host ip addresses, this addresses will be gained by the third subnet we gained in task 2. i.e. 192.168.1.92/26
First, we need to determine how many host bits will be needed in the hosts portion.
2^n-2= 30
2^4-2=14, which will not be enough.
2^5-2= 30, which will be enough and will allow for expansion.
Therefore, the hosts portion will have 5 bits and the network portion will borrow 3 bit from the fourth octet.
The new subnet mask for the network 192.168.1.192/26 will be as shown below.

This is 255.255.255.224
Therefore, the increment will be 32
The first network will be as shown below. 192.168.1.192/27

The second and last network will be 192.168.1.224/27

Task 4. 3 subnets with 2 host ip addresses.
The final task is to subnet the 192.168.1.224/27 subnet to give three subnets each with 2 host ip addresses.
First we determine how many host ip address bits will be needed.
2^n-2=2
2^2-2=2 will be enough.
Therefore, the host portion will have 2 bits, while the network segment will borrow 6 bits.
The new subnet mask for the network 192.168.1.224/27 will be.

The subnet mask is: 255.255.255.252
The increment in this network will be 4.
The three networks that we require will be:
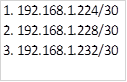
These networks are appropriate for point to point links. Such as a link between two routers.
Suppernetting
In the previous section we have discussed subnetting which is the dividing up of a large network into smaller ones. Suppernetting is the opposite of this and it is where we combine small networks to give us one large networks. This concept will be discussed in detail when we will be looking at route summarization, however, the steps taken to supernet are shown in the next scenario.
Supernetting lab
In this scenario we have been given the following subnets:
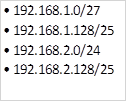
Our task is to supernett these ip addresses to give us a summary address.
Step 1. Write down the ip networks in binary form.
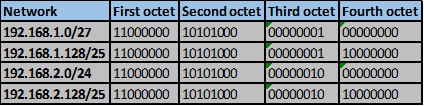
Step 2. Determine the number of similar bits on each network and draw a line to mark the end of matching bits.

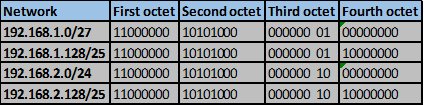
Step 3. Count the number of matching bits and write their equivalent in decimal format.
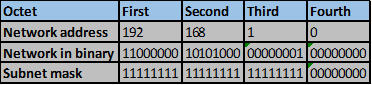
In this scenario, the matching bits are the first and second octet as well as the first six bits in the third octet.
They can be represented as shown below.
192.168.0.0
Step 4. We need to determine the new subnet mask for this summary address:
For the matching bits, place all “1s”.
This will be: 11111111.11111111.11111100.00000000
This is the new subnet mask which is equivalent to the decimal shown below.
255.255.252.0
Therefore the new network will be: 192.168.0.0/22
This is the supernet for the networks that we had.
NOTE: in this chapter, we have discussed supernetting briefly, these concepts will be better understood when we are in the routing chapters.
Summary
With the brief discussion on supernetting, we have come to the end of this chapter on IPv4 addressing. These concepts will be applied throughout the course therefore, be sure to grasp them well. You are advised to practice as much as you can on subnetting, VLSM subnetting and supernetting. In the next chapter, we will look at the data link layer of the OSI model.